

How To Use Tensorflow In Windows
Installing Tensorflow with CUDA, cuDNN and GPU support on Windows 10
Pimp Upward your PC for Deep Learning — Part 2
In Part 1 of this series, I discussed how you lot tin can upgrade your PC hardware to incorporate a CUDA Toolkit uniform graphics processing bill of fare, such equally an Nvidia GPU. This Function 2 covers the installation of CUDA, cuDNN and Tensorflow on Windows 10. This article below assumes that you lot accept a CUDA-uniform GPU already installed on your PC; but if y'all haven't got this already, Function one of this series will help you get that hardware set up, gear up for these steps.
Pace 1: Cheque the software you will demand to install
Assuming that Windows is already installed on your PC, the additional $.25 of software y'all will install as part of these steps are:-
- Microsoft Visual Studio
- the NVIDIA CUDA Toolkit
- NVIDIA cuDNN
- Python
- Tensorflow (with GPU support)
Pace 2: Download Visual Studio Express
Visual Studio is a Prerequisite for CUDA Toolkit
Visual studio is required for the installation of Nvidia CUDA Toolkit (this prerequisite is referred to here). If y'all attempt to download and install CUDA Toolkit for Windows without having beginning installed Visual Studio, you get the bulletin shown in Fig. one.

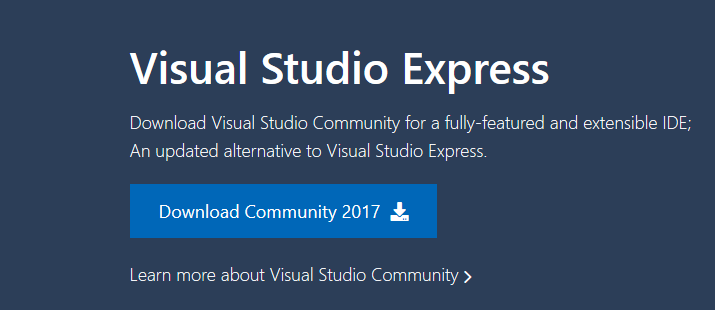
Selecting and downloading Visual Studio Limited
At the time of writing, the virtually recent version of Visual Studio (which is free) is the Visual Studio Express Community Version 2017, shown in Fig ii. You can get previous versions of Visual Studio for free by joining "Visual Studio Dev Essentials" and and then searching for the version of Visual Studio you want.
Installing Visual Studio Express
Once you accept downloaded Visual Studio Express, its installation is straightforward. Fig 3 shows the executable file you receive as a download.

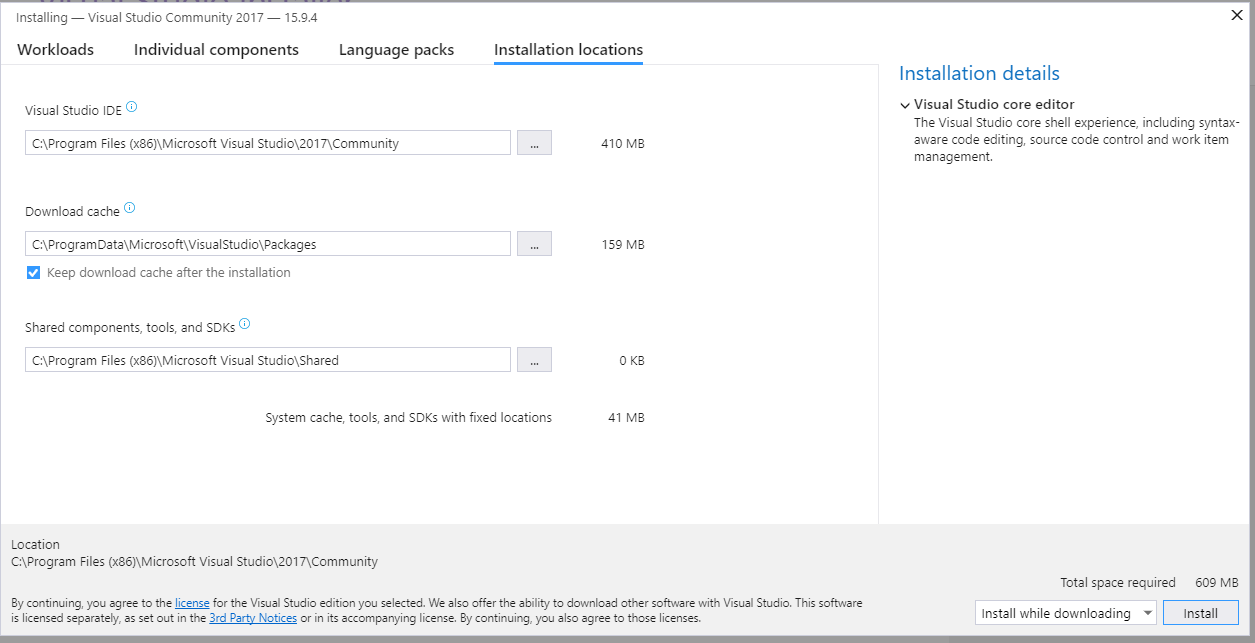
When you press the 'save file' option on Fig iii, the window in Fig 4 volition appear where you can prepare installation options (or just exit them as they are by default, as I did).
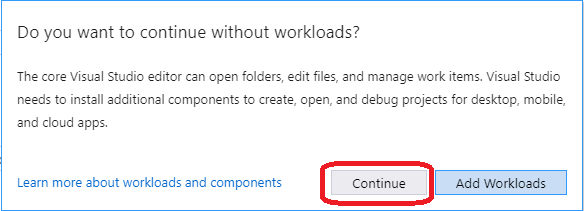
During installation, Visual Studio prompts you to as whether you 'desire to go along without workloads'. I pressed 'keep' here, as I had no intention of using workloads at all.
A PC reboot after installation of Visual Studio May be Required
After installing Visual Studio, I initially moved direct on to downloading and attempting to install CUDA Toolkit for Windows — that footstep is Step iii which I will exist describing next. I got a message that Visual Studio was still operating and was preventing the installation of CUDA Toolkit. Rebooting my PC earlier attempting to install CUDA Toolkit again solved this problem.
Stride 3: Download CUDA Toolkit for Windows 10
These CUDA installation steps are loosely based on the Nvidia CUDA installation guide for windows. The CUDA Toolkit (free) tin can be downloaded from the Nvidia website here.
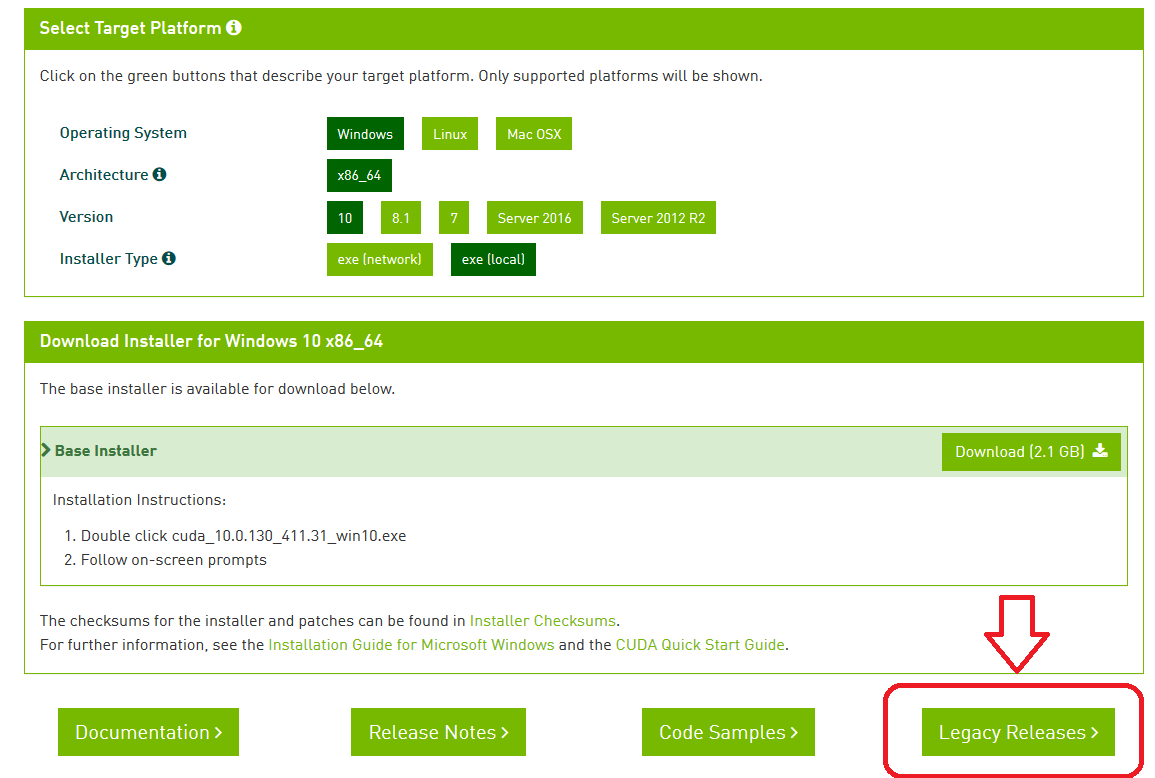
At the time of writing, the default version of CUDA Toolkit offered is version 10.0, every bit shown in Fig 6. However, y'all should bank check which version of CUDA Toolkit y'all choose for download and installation to ensure compatibility with Tensorflow (looking ahead to Step vii of this process). When you go onto the Tensorflow website, the latest version of Tensorflow available (1.12.0) requires CUDA ix.0, not CUDA 10.0. To find CUDA 9.0, yous need to navigate to the "Legacy Releases" on the lesser right hand side of Fig 6.
Pace 3.1: Downloading CUDA nine.0 from the CUDA Toolkit Annal
Choosing "Legacy Releases" takes y'all to the CUDA Toolkit Archive. Based on Tensorflow installation guidance, the CUDA version required is 9.0, equally listed in Fig 7.

Step three.2: Installing CUDA nine.0
CUDA 9.0 comes as a base installation and iv patches; the base installation of CUDA ix.0 must be installed first, followed by the patches. The options for the base install which I selected are shown in Fig 8.

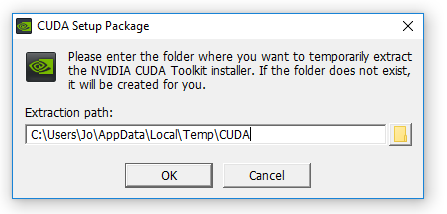
Running the base installer which has just been downloaded will produce the CUDA Setup Package window, every bit shown in Fig 9.
The CUDA installer extracts to your PC and, when consummate, the NVIDIA CUDA Toolkit installation will get-go; y'all will get a message to that issue. The resulting NVIDIA Installer windows throughout the installation process are shown at Fig ten — Fig thirteen. I chose the express installation choice (Fig. 10).

Fig. 11 provides the opportunity to select installation location; I chose the default locations provided, which for CUDA is :
C:\Program Files\NVIDA GPU Computing Toolkit\CUDA\v9.0 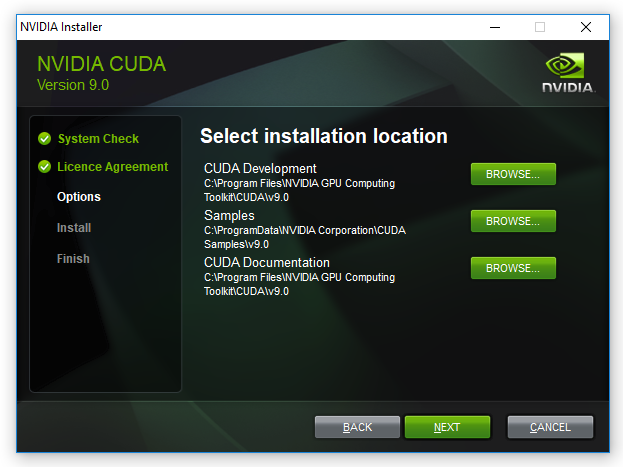
Fig. 12 beneath shows the CUDA installations which rely on Visual studio, previously installed in Pace 1.
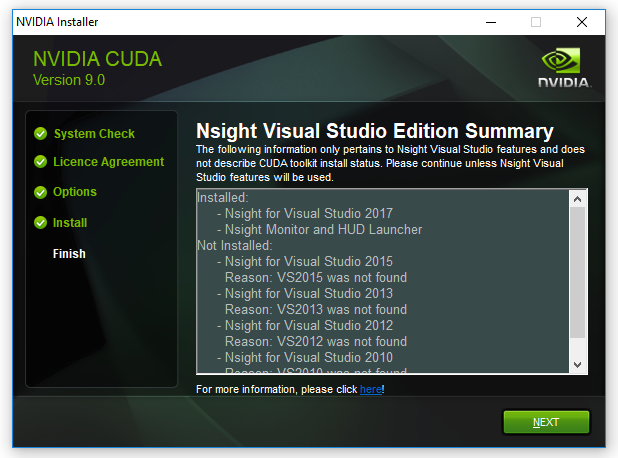
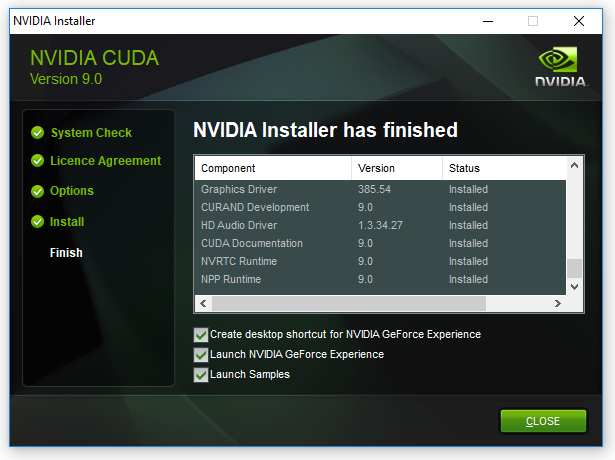
Pressing 'adjacent' at the window shown in Fig. 12 above, gives the concluding installation window, shown as Fig.xiii below, where the NVIDIA installer is marked as finished.
Step 4: Download Windows 10 CUDA patches
At the time of writing, there are four CUDA patches to go (as well as the base installer), so let's become and download these. They are shown in Fig.xiv.

When the four patches are downloaded, they can be installed in the same way every bit the base installer — with installation windows providing guidance through the procedure.
Step 5: Download and Install cuDNN
Having installed CUDA 9.0 base installer and its four patches, the adjacent stride is to find a compatible version of CuDNN. Based on the data on the Tensorflow website, Tensorflow with GPU support requires a cuDNN version of at least 7.two.
Step 5.ane: Downloading cuDNN
In order to download CuDNN, you lot have to annals to become a member of the NVIDIA Developer Program (which is free).

When you lot create an account, login and fill out some other required details near why you are using the account, you go the download page shown in Fig. sixteen.
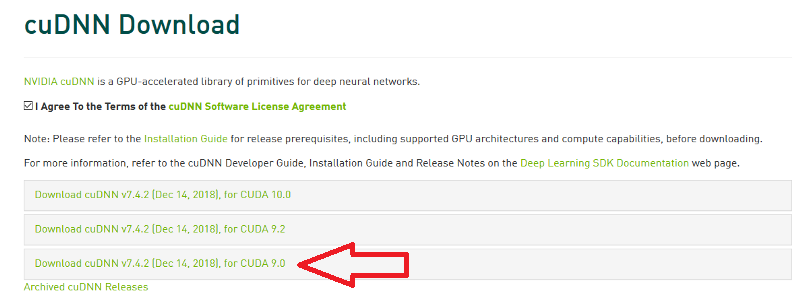
As I take downloaded CUDA 9.0, the respective version of cuDNN is version 7.iv.2. Choosing cuDNN version 7.four.2 enables the download every bit a zip file named equally follows:
cudnn-ix.0-windows10-x64-v7.zero Step 5.2: Unzipping cuDNN files and copying to CUDA folders
Instructions at Nvidia provide support for windows cuDNN installation, as practice instructions on the Tensorflow website ; I take reproduced these instructions in distilled form, based on my implementation of them. In my case, I downloaded the cuDNN .zippo file named above into a folder which has the post-obit path on my PC (your path will no doubt exist different).
C:\Users\jo\Documents\cuDNN_downloads\ In the instructions below, I refer to the folder path " C:\Users\jo\Documents\cuDNN_downloads\" (referred to only in a higher place) as "<downloadpath>", such that the zip file is now in the path:
<downloadpath>\cudnn-ix.0-windows10-x64-v7.5.0.56.nil I unzipped the cuDNN ".zip" file where I downloaded information technology, hence the unzipped folder structure which will contain the required cuDNN files is at present:-
<downloadpath>\cudnn-9.0-windows10-x64-v7.5.0.56\ In that location are three files in the unzipped cuDNN folder subdirectories which are to be copied into the CUDA Toolkit directories. These are cudnn64_7.dll, cudnn.h and :
1. cudnn64_7.dll
cudnn64_7.dll can be found in the post-obit path within the downloaded cuDNN files:
<downloadpath>\cudnn-ix.0-windows10-x64-v7.five.0.56\cuda\bin\cudnn64_7.dll Bold that y'all installed CUDA ix.0 to its default path (as I did at Step ii.3), namely the following default path:
C:\Program Files\NVIDA GPU Calculating Toolkit\CUDA\v9.0 y'all can copy the cudnn64_7.dll file directly into the CUDA folder's bin folder path (annotation: you don't need to create any new subfolders):
C:\Program Files\NVIDIA GPU Computing Toolkit\CUDA\v9.0\bin\ 2. cudnn.h
Equally with the cudnn64_7.dll file above, afterwards downloading and unzipping the cuDNN folder, the header file cudnn64.h can be institute in the path:
<downloadpath>\cudnn-nine.0-windows10-x64-v7.5.0.56\cuda\ include\cudnn.h Again, assuming that you installed CUDA 9.0 into the default path as I did at Step 2.iii, copy cudnn.h directly into the CUDA folder with the following path (no new subfolders are necessary):
C:\Plan Files\NVIDIA GPU Computing Toolkit\CUDA\v9.0\include\ 3. cudnn.lib
The .lib file cudnn.lib can exist found in the downloaded cuDNN path:
<downloadpath>\cudnn-nine.0-windows10-x64-v7.5.0.56\cuda\lib\x64\cudnn.lib Copy cudnn.lib directly into the CUDA folder with the following path:
C:\Program Files\NVIDIA GPU Calculating Toolkit\CUDA\v9.0\lib\x64\ Step 5.three: Checking CUDA environment variables are set in Windows
Finally, the instructions at Nvidia directly that you ensure that the CUDA surround variable has previously been set up, as follows:
            Variable Name: CUDA_PATH
Variable Value: C:\Program Files\NVIDIA GPU Calculating Toolkit\CUDA\v9.0
In Windows x, the Environment Variables can be found past choosing:
Control Panel ->System and Security->Organisation->Avant-garde Organization settings.
This opens up a window called "System Properties" (Fig 17), at which point the "Environment Variables" button should exist called.
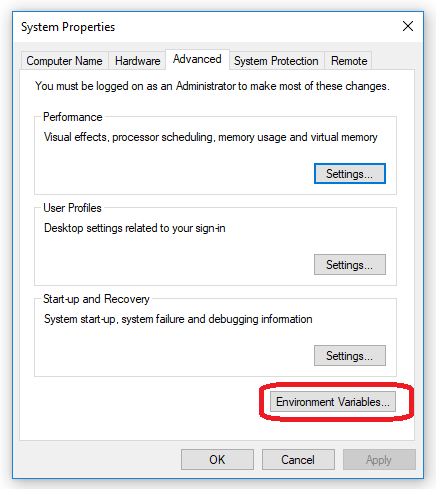
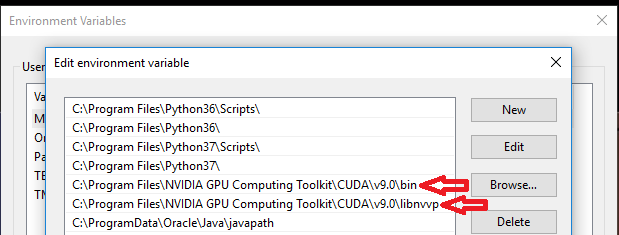
When the Environment Variables window then appears, within "organisation variables" (in the lesser one-half of the window), click on "Path" and choose the push "edit". A new window will appear, called "Edit surround variable" as shown in Fig xviii below.
On checking the Environment Variables, I found the installation procedure which determines the CUDA installation path — Step 3.2, run into Fig. eleven — had already added 2 paths to CUDA . These paths are shown in Fig 18 below, so I found I did not need to add a further CUDA path.
Step 6: Install Python (if you lot don't already accept information technology)
Now that CUDA and cuDNN are installed, information technology is time to install Python to enable Tensorflow to be installed later on. At the time of writing, the most up to date version of Python iii available is Python 3.7, but the Python 3 versions required for Tensorflow are 3.four, 3.5 or 3.6. Python iii.half dozen can exist downloaded for Windows 10 from here. When you run the Python installer for windows, the setup window in Fig xix will appear.
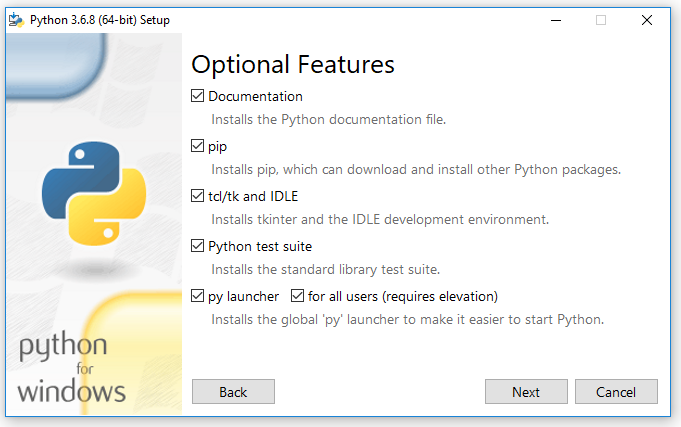
Of the options in Fig. xix above during Python installation, I chose to select all of them. These options are useful: Python's 'pip' installer is used at Step 7.2 of this guide to install Tensorflow. Additionally, I use the IDE (integrated development environment for writing and running python code) called "IDLE" at Step viii.
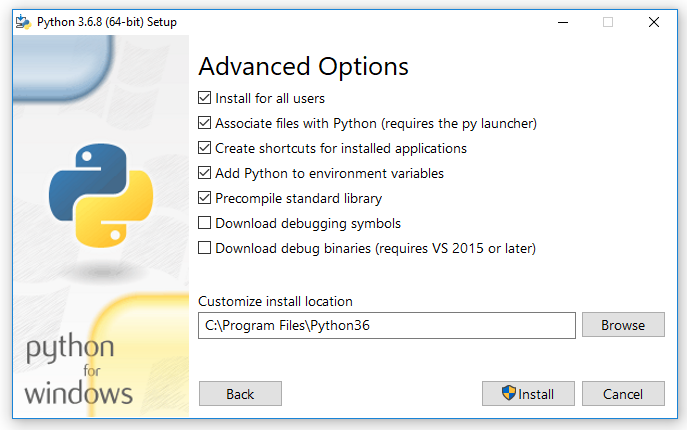
In the "Advanced Options" (shown at Fig 20 beneath), I chose the installation of Python for all users (which was not ticked by default); this gives the more useful organization wide installation.
Step 7: Install Tensorflow with GPU support
Tensorflow provides instructions for checking that CUDA, cuDNN and (optional: CUPTI) installation directories are correctly added to the PATH ecology variables. Equally the three cuDNN files were copied into the subfolders of CUDA, I did not update the existing CUDA environmental variables path.
Pace 7.one: Calling upwards the command prompt with administration rights
In this footstep a organisation-wide install of Tensorflow is carried out, non a per user install. Organisation wide installation of Tensorflow requires administrative rights, therefore, accordingly the command prompt should exist run with administrative rights.
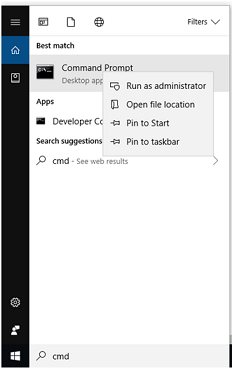
Open up up the command prompt by running 'cmd' in the search bar, and then correct clicking on control prompt to choose 'run equally administrator'. This opens upward Administrator: Control Prompt equally shown in Fig 21.
Footstep 7.2: System wide install of Tensorflow via python pip
Having opened the Command Prompt, the system-broad installation command for Tensorflow with GPU back up is equally follows:
pip3 install --upgrade tensorflow-gpu The "pip3" command (every bit opposed to "pip") is required as the installation is to Python three. Execution of this control in the command prompt is shown in Fig 22.
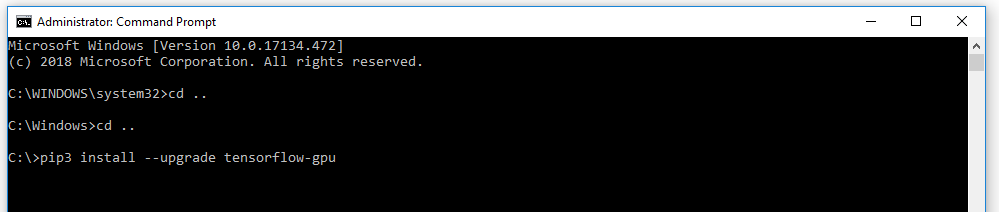
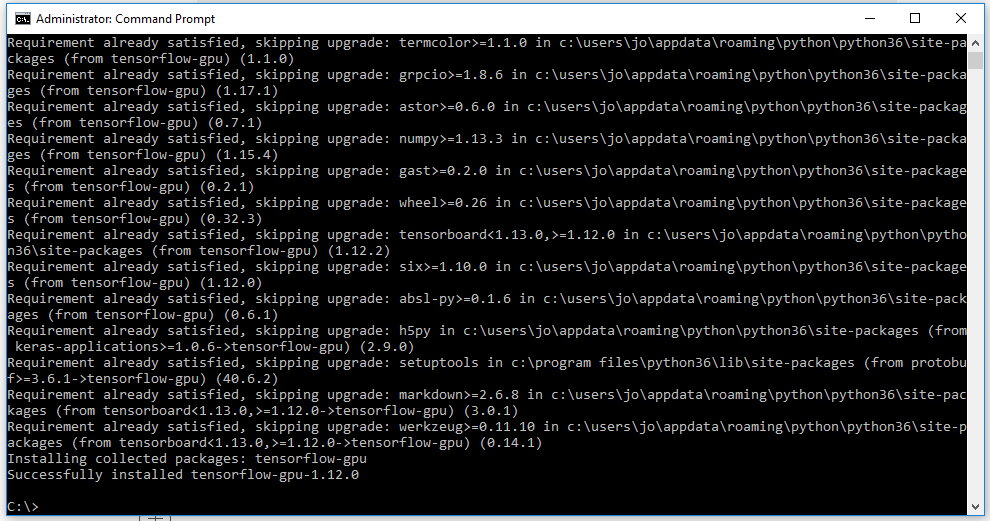
The resulting output from the command is shown in Fig 23, and if all goes to programme there should eventually be a message to ostend that Tensorflow has been installed successfully.
Footstep 8: Test Installation of TensorFlow and its access to GPU
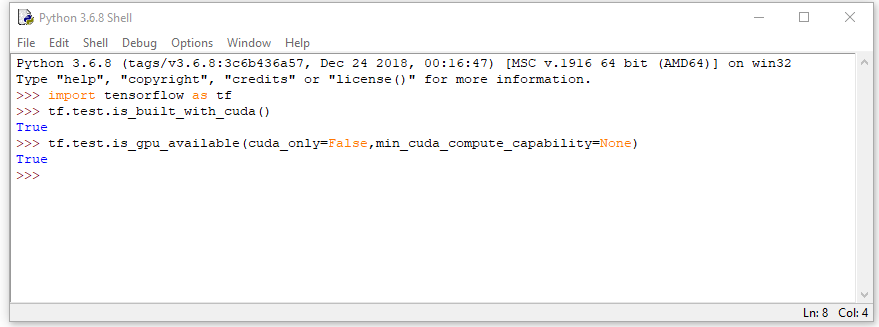
Go to the start menu in windows and search for the IDE called 'idle', which volition be installed as role of your python installation if you lot selected as I did at Stride 6. A Python window should appear labelled Python 3.half-dozen.x Vanquish . At the prompt (denoted by '>>>'), import the Tensorflow package. This will check that Tensorflow has been installed (equally you can import information technology). The control for the IDLE shell to import the tensorflow package is as follows:
            # importing the tensorflow package
import tensorflow equally tf
To test CUDA back up for your Tensorflow installation, you tin run the following command in the shell:
tf.test.is_built_with_cuda() Finally, to confirm that the GPU is bachelor to Tensorflow, you can examination using a congenital-in utility function in TensorFlow as shown here:
tf.test.is_gpu_available(cuda_only=False, min_cuda_compute_capability=None) It takes a few minutes to return a effect from this; when it is finished it returns True , and then the prompt `>>>`appears again. Importing tensorflow and these tests are all shown in Fig 24 in the Python IDLE Shell.
Conclusions
These were the steps I took to install Visual Studio, CUDA Toolkit, CuDNN and Python 3.6, all with the ultimate aim of installing Tensorflow with GPU support on Windows x. To appointment, my GPU based machine learning and deep learning work has been on Linux Ubuntu machines; by the aforementioned token, much of the machine learning community support online focuses on Ubuntu.
For Machine Learning, the major drawback to using Windows is that information technology is necessary to build more than things from source (for example using Cmake) than on Linux, and too to install boosted software for the build processes, such as Visual Studio. For example, if yous were to install Caffe2 on Windows, there are no pre-built binaries and Windows build is in testing and beta mode. I installed CUDA and cuDNN on Windows 10 more out of curiosity than annihilation else, merely to see how straightforward (or otherwise) it was.
As I intimated in Office 1, at present that CUDA, cuDNN and Tensorflow are successfully installed on Windows 10 and I have checked Tensorflow's admission to GPU, I am going to sweep the whole Windows 10 operating system away in order to make a fresh installation of Ubuntu eighteen.04 LTS. This new installation of Ubuntu will exist covered in Part 3 of this series.
This article has also been published here on my own web log.
Source: https://towardsdatascience.com/installing-tensorflow-with-cuda-cudnn-and-gpu-support-on-windows-10-60693e46e781
Posted by: williamshisenturning.blogspot.com
0 Response to "How To Use Tensorflow In Windows"
Post a Comment